Our control room consoles are designed and built from the ground up to cater to the strict requirements of your operations. This means that they can vary widely in size, shape, functionality, and features. To accommodate such wide range of scenarios our consoles are designed with a modular structure to give maximum flexibility all while providing a robust backbone to sustain all your operational equipment.

In the following sections, we’ll delve into the most crucial parts of our consoles to gain a better understanding of how each component contributes to enhancing your control room needs. Additionally, we’ll provide instructions on how to operate our cutting-edge personal environment unit and share Tresco’s approach for designing and implementing consoles to fit any control room environment.

The following links let you jump right into any section that peaks your interest:

  1. Understanding your Console
  2. How to operate your Personal Environment Unit
  3. Tresco Project Outline

Let’s analyze the various components of our console to understand their purpose and how they integrate. This will help you use the console’s features more effectively, customize your control room operations, and improve operator efficiency.
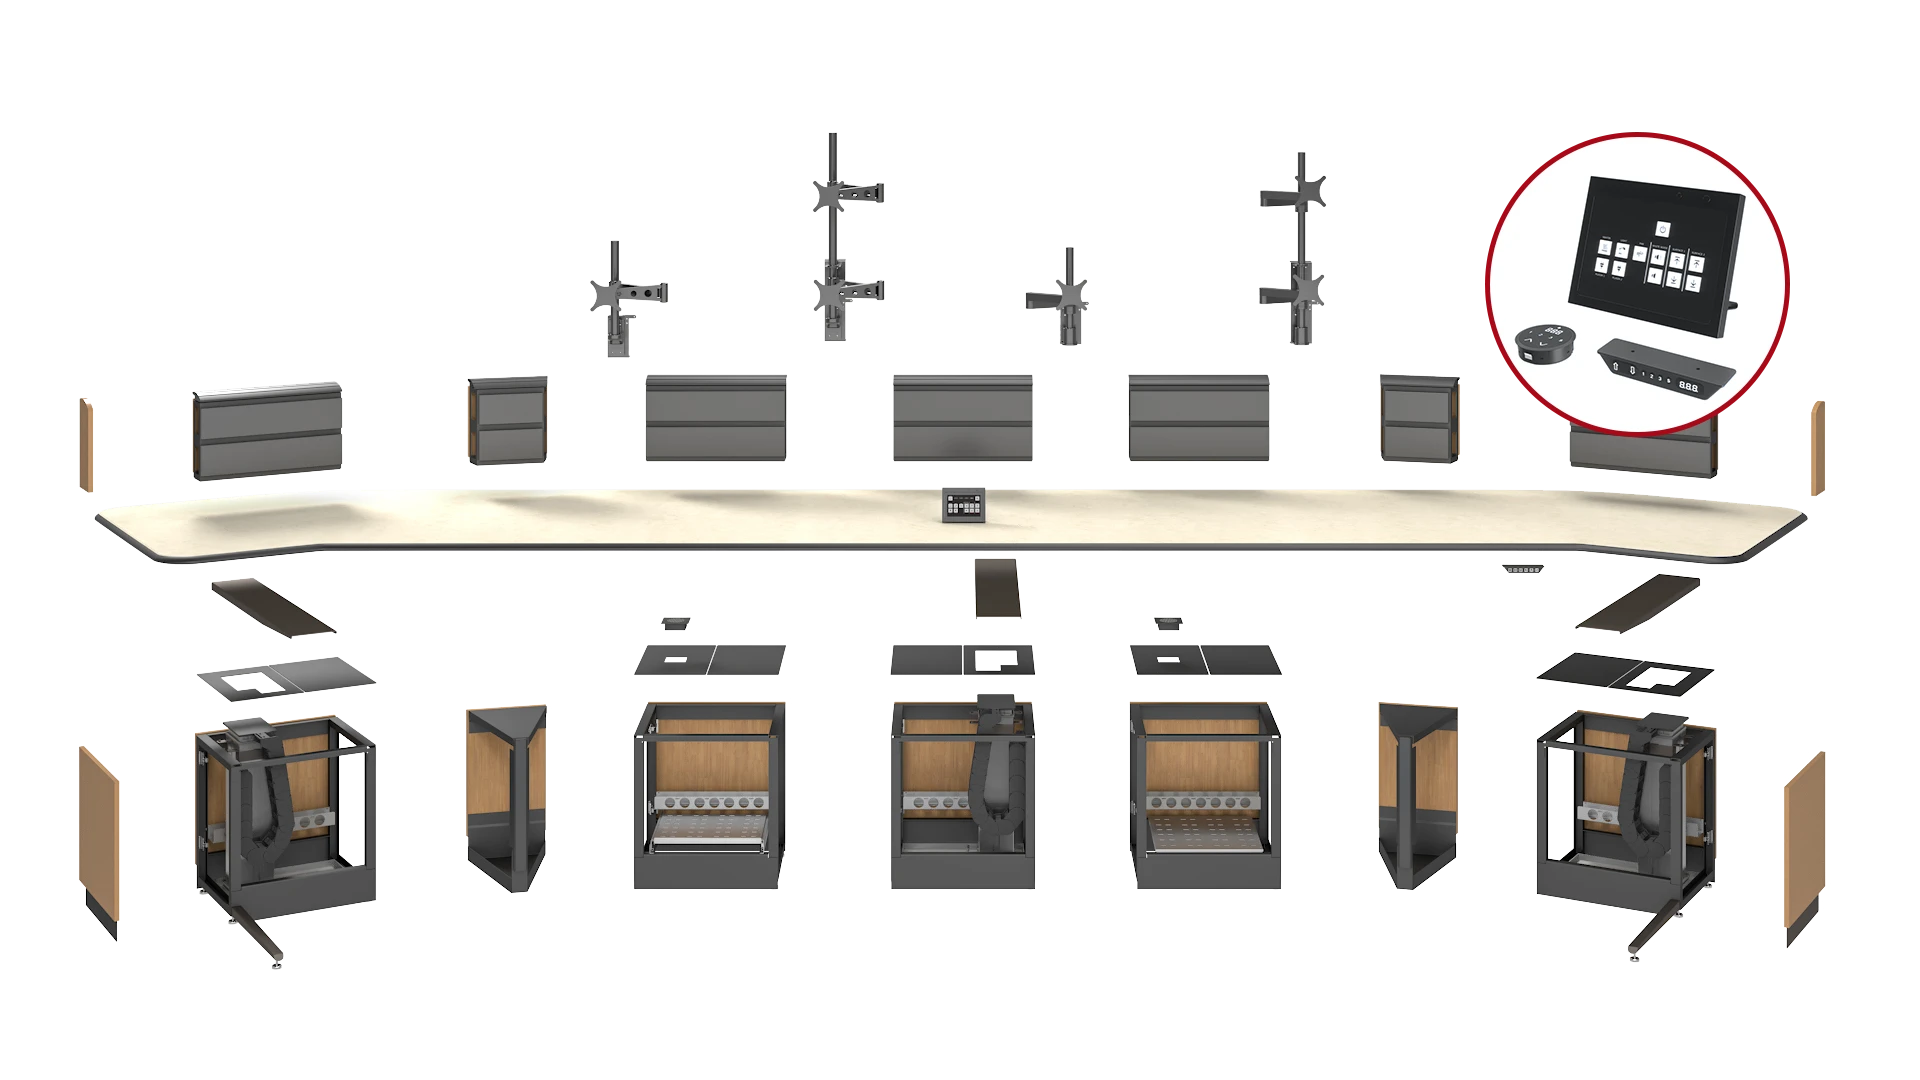
Console exploded view | Tresco Consoles
Worksurface
Console Frame
Cantilevers/work surface support arms
Backwall
Cable Tray
Sliding equipment trays
Wedge Sections
Sub Panel
Gables/End caps
Gables/End caps
Cantilevers/work surface support arms
Kick Plates
Lift Columns
Lift Columns

Backwall – Sturdy and customizable frames mounted atop the worksurface, provide anchoring points for monitor arms and facilitate cable routing to maintain an uncluttered and organized workstation.

Cable Tray – An integral part of the cable management system, providing a sturdy frame for installers to anchor and route necessary cables through the console.

Cantilevers/work surface support arms – The crucial link between custom console bay arrangements and the work surface, provides essential support for the characteristic robust and durable Tresco build.

Control box (CBD6S) – The core of your console’s height adjustment system, serving as both the brain and power supply

Gables /End caps – Finishing elements at either side of the console, designed to protect frames and back walls, ensuring optimal durability.

Kick Plates – Protective metal plates safeguarding the console from constant contact with the operator’s feet.

Lift columns – Electro-Mechanical Lifting Columns that allow the workstation to be raised to the desired height

Monitor arms – Fully adjustable and customizable monitor mounts catering to your operational needs and screen size requirements.

Sit-stand control controls – Controls designed to allow the user to adjust the height of the lifting columns, set memory and display height, and error codes.

Sliding equipment trays – 12-gauge steel plates with robust sliding mechanisms, facilitating easy access to electrical or mechanical equipment mounted inside the console.

Sub  Panel – When the console is in the standing position These panels enclose the console to provide a clean finish so you do not see cables and computers.

Ventilation fans – Console ventilation fans are designed to push out hot air from the frame to maintain the optimal operating temperature. They are engineered to maximize airflow, reduce noise, and increase the lifespan of the internal components of the console.

Vertical Cable Management – Flexible and adjustable cable management solution, ensuring maximum mobility during workstation height adjustments.

Worksurface – The primary interface between the operator and the console, often single but adaptable to dual configurations for specific operational needs.

Wedge Sections – Console connecting sections that allow Tresco to make unique shapes


If your console is equipped with a personal environment unit, then you have access to the highest level of ergonomic comfort at the tip of your fingers. Let’s explore how to operate the system in the following video. We left out a couple of helpful links if you want to jump to specific features of the Tresco Personal Environment System.

Tresco Project Outline | Tresco Consoles

At Tresco, we pride ourselves on our ability to properly elicit the requirements from your project stakeholders to build the foundation of your control room console transformation.

Our team of control console experts have the experience and knowledge to ask relevant questions to ensure your control room transforms into a functional and productive space for your operators.

The following are the key steps within out process:

  1. Project Initiation: Cadence, Timelines & Requirements
  2. Solution Design
  3. Approval & Sign-off
  4. Manufacturing
  5. Factory Acceptance Testing
  6. Logistics, Delivery & Install
  7. Project Approval & Closure
  8. Post-Install Care & Maintenance

Gain valuable insight into our process through the Tresco Project Outline whitepaper. This document showcases how we identify and address operational needs by developing strategic console solutions, and ultimately bringing them to life. Our consoles are built from the ground up to optimize your internal monitoring processes, helping you to achieve greater efficiency and mission-critical success.

INTRIGUED BY THE POSIBILITIES?

GET IN TOUCH WITH US TODAY AND DISCOVER

THE FUTURE OF YOUR CONTROL ROOM